
![]() Fancy a romantic coffee break? Here goes a perfect companion for coffee: French dessert with beautiful lace, coffee tuiles.
Fancy a romantic coffee break? Here goes a perfect companion for coffee: French dessert with beautiful lace, coffee tuiles.
Watch the video to see how crisp they are and how beautiful the lace is.
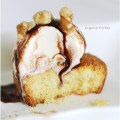
Those crisp French wafers are perfect little sweet treats by themselves. But these are frequently served in a dessert for exquisite finish at better restaurants in Paris. Sweet crisp tuiles are especially good with soft desserts such as ice cream and creme caramel (custard pudding).
I made tuiles for the first time at the cooking school in Paris. It was a part of basic pastry course. I thought it was easy. But it wasn’t exactly so since the wafers got stiffen fast out of oven and I didn’t have enough time to transfer the tuiles on the rolling pins.
On my Facebook tuiles were requested a few times and I thought I should write this recipe as soon as possible because these were one of the basics in French pastry. And today I am finally writing this post. Yay!
There are two types of tuiles: no lace version (such as almond tuiles) and laced tuiles. Today I am making coffee tuiles with lace, tuiles dentelles. The recipe is pretty simple.
For coffee tuiles, make the batter by mixing all the ingredients, first. The batter is liquidy. So chill in the refrigerator for one hour.
And make disks with a teaspoon of batter on a silpat.
Spread the batter like this with the back of a spoon. There should be enough room between the disks because they look very thin, yet they spread in the oven.
Bake in the oven preheated to 300 F. (150 C.) for 10 to 12 minutes. There will be a lot of dramatic bubbling. Check out my short video below.
Then out of oven, immediately transfer the wafers to a rolling pin. And press the ends of the wafers to form roof tiles.
Those silicon baking mats are a must for me: it’s easy to remove tuiles out of a silpat and cleaning silpats is a snap. In Paris I used to use French Demarles silpat but any silpat (like mine) will do the job.
- ⅓ cup confectioners’ sugar (42g)
- 1 tablespoon espresso
- 1 tablespoon water
- 3 tablespoons unsalted butter, melted (21g)
- 3 tablespoons all-purpose flour (23g)
- Preheat oven to 300° F. (150° C.)
- In a bowl add in water, warm espresso, and warm melted unsalted butter. Mix well. Then stir in confectioners‘ sugar. Finally sift in all-purpose flour. Whisk until homogeneous. The batter will be very liquidy. Let chill in the refrigerator for one hour.
- On a silpat, or a greased pan, make disks with a teaspoon of batter. Spread the batter flat with the back of the teaspoon.
- Bake for 10 to 12 minutes, or until dry and set.
- Out of oven, immediately transfer the disks to a rolling pin. And press the ends of the wafers to form roof tiles.
Anne says
Oh these are gorgeous Eugenie. I can’t believe I’ve never made tuiles before. This is a must try. I have to check out the video.
EugenieKitchen says
Thank you! Like the video in this post I will make more short videos which shows only important parts. That way I will be able to spend more time cooking rather than working too much on just editing. Happy cooking, Anne. 🙂
Anne says
That’s a great idea. Editing is so time consuming.
EugenieKitchen says
Not really, Vicky. Tuiles (both savory and sweet) are frequently used to decorate food at fine dining restos but they are easy to make. And it requires only a few ingredients! > <
Laura Silgado says
It Looks amazing ! I love your photos!!! 🙂 im going to make tuiles yuhuuu
EugenieKitchen says
So happy cooking, Laura! 🙂
Jamie Barba says
Hey Eugenie, I want to make this but I don’t have silpat. What alternative can I use? Thank you! Xoxo, Jamie
EugenieKitchen says
Hi Jamie, it’s just my preference. Greased pan or parchment papers work as well. Happy cooking! xx
EugenieKitchen says
Hi, Carrie! Yes, instant coffee powder is surely great, too. But this recipe needs powdered sugar. Just blend regular table sugar to make it powdery. 🙂
Dorcas Qian says
WHO DO NOT LIKE IT~~ 🙂 GOOD JOB!
Angel Chen says
Hi Eugenie, since i only has one silpat when i am baking one batch, does the rest of the batter get dry? thank you ~
EugenieKitchen says
Hi, store the batter in the refrigerator during that time. Chilled batter works better.
Cocodenata says
Will definitely give this a try! Can I use brewed premix coffee for this recipe? Thanks Eugenie!
EugenieKitchen says
Hi, Premix is not recommended. But instant espresso powder will be fine.
Owl says
I’ve been wanting to learn how to make tuiles for ages, but I’ve always been too intimidated. They seem so delicate and precise at first glance; not a good mix for someone who bakes like I do. (Very clumsily, that is.) After watching your tutorial it doesn’t seem so scary anymore though! I’m definitely adding this to my list of Christmas goodies for this year. 🙂 It’ll go well alongside the double ginger molasses cookies my friends beg for.
Thanks for sharing!
EugenieKitchen says
Right, tuiles will make good presents for Christmas. And yes, they can be pretty fragile but guests will be delighted. Personally I love just one tuile with espresso, which is a neat way to finish a meal for any day. 🙂
Sheila Chen says
I hope that when I make this, it will turn out as pretty as the ones you have made. Can’t wait to see how they will turn out!
EugenieKitchen says
Good luck, Sheila! Happy to see you here on my blog as well. 🙂
Dhara says
I made this today. This came out crispy and yummy. Thank you for this amazing recipe. Your voice and accent just makes my day, but this video made my whole week. Yayyy!!
Lots of love from Berkeley,
Dhara
EugenieKitchen says
Glad to hear that, Dhara. Thanks! 🙂
Magdalen says
I am going to try and make this with my husband! Thank you for the recipe. 🙂
EugenieKitchen says
Happy cooking, Magdalen! 🙂
Sarah Sweetness says
I would love to win the giveaway! I love your recipes and have tried a few myself 🙂 xx
my username is sweetnessoverloaddd on youtube!
koom says
i love it
Akemi says
I just made some but mine did not develop those beautiful laces. 🙁 The only difference is that I used parchment paper instead of the silpat. What do you think I did wrong? Any help is very much appreciated! Thanks
EugenieKitchen says
Hi, make sure to cool the batter before baking and bake at the low temp., 300F/150C. I’m making those again next week. Better luck next time!
Akemi says
I will certainly give it another shot! Thank you so much for your help! 🙂
Jess Elfie says
Hello Eugenie,
Wow just when I was looking for something crunchy to decorate my chocolate mousse cake, you came up with this recipe! Thank you so much for sharing! And the tea set is absolutely beautiful….!!!!! ^^
EugenieKitchen says
Hi Jess! My family really loved coffee tuiles this week, I will make many different versions next week. One tuile with an espresso is just perfect. It’s very neat, too. Happy cooking.
Sahar Osama says
Hi eugenie I am sahar I love cooking I am 13 and when I was 11 I made pizza I love your recipes and I have been inspired with your recipes I want to become a chef like you
EugenieKitchen says
That’s awesome, Sahar. Wish you all the best things in your future. 🙂
EugenieKitchen says
Good luck, Vicky!
EugenieKitchen says
That will be perfect, Filipe! :3
grace says
This looks delicious and I have all the ingredients 😉 Thank you for another simple recipe.
EugenieKitchen says
Happy cooking, Grace! 🙂
Amy Lu says
I loove your recipes, they inspire me to bake 🙂
EugenieKitchen says
Glad to hear that, Amy! Happy baking. 🙂
Jeanne says
Hi eugenie…i love a lot of your recipes. Can i ask a question ? I dont have a silicon baking mat then i used parchment paper with butter. But then the coffe tuiles its not easy to remove it. Did i do something wrong ? Thank u.
EugenieKitchen says
Silpat is my preference but parchment paper is okay. Good luck, Jeanne.
Edith C says
Can we bake two trays together?
EugenieKitchen says
Yes!
Krissie says
I like how this recipe is so simple yet the final product looks so elegant. A perfect thing to bring on a tea party, especially if you have one of those Royal Albert tea set!
EugenieKitchen says
Couldn’t agree more, Krissie. 🙂